|
JaiaBot 2.7.0
JaiaBot micro-AUV software
|

|
|
JaiaBot 2.7.0
JaiaBot micro-AUV software
|
|
JaiaBot uses the Raspberry Pi (RP) Compute Module 4 (CM4) as the embedded Linux computer. For R&D purposes, it has also been necessary to run the jaiabot software on a Raspberry Pi 3 although this is not ideal due to the port mappings being different from the RP4.
Download the appropriate .img.gz from AWS S3 (produced by CircleCI): https://us-east-1.console.aws.amazon.com/s3/buckets/jaia-disk-images?region=us-east-1&bucketType=general&prefix=release/2.y/rpi/&showversions=false
Flash this to as many SD cards as you have bots plus hubs:
Create a fleet, authorize the fleet to self-configure the service VPN (vpn.jaia.tech), generate first-boot configurations, and boot:
This new bot or hub must belong to a configured fleet. Fleets are configured using a Fleet Config file which is a Protobuf TextFormat version of the jaiabot.message.FleetConfig message (jaiabot/src/lib/message/fleet_config.proto).
The simplest way to create a new fleet is to use the jaia tool (e.g. for fleet5):
This will prompt you using a whiptail UI to set the various fleet related settings, and write the contents to fleet5.cfg.
This tool will also create the hub keys, VPN temporary keys as necessary and include those in the fleet configuration file.
Once you have a fleet, you can begin flashing the bots/hubs.
Note: this step should only need to be done once per new CM4.
The RP bootloader on older CM4 boards does not boot from all the USB ports automatically. Thus, we need to update the bootloader configuration once on each CM4 that we receive in order to ensure that the CM4 will boot from the USB thumb drive.
boot.conf file, check that the BOOT_ORDER line is set to BOOT_ORDER=0xf25641. For more detail on reading the value, see the BOOT_ORDER documentation. Older CM4s were omitting the 0x5 value (which corresponds to the USB-A port on the CM4 IO board).../rpiboot -d .), I had to use sudo ../rpiboot -d .sudo ../rpiboot -d .), power on the CM4 IO board. The script should detect the board at this point and upload the configuration changes. It will provide some verbose output to this effect.Note: this step should only need to be done once per change to jaiabot/rootfs files (and then reused for any number of USB thumb drives).
Normally you will just download the appropriate image from CircleCI or AWS S3.
The jaiabot/rootfs folder is designed to generate a complete filesystem suitable to boot the RP off a USB thumb drive or other USB disk.
To generate the image, follow the steps in https://github.com/jaiarobotics/jaiabot/blob/2.y/rootfs/README.md.
The result will be something like jaiabot_img-1.0.0~alpha1+5+g90e72a3.img.
# assuming USB thumb drive is on /dev/sdd
sudo dd if=jaiabot_img-1.0.0~alpha1+5+g90e72a3.img of=/dev/sdd bs=1M status=progress
The newly created image needs certain configuration to run properly: is this a bot or a hub, what ID is it, what fleet does it belong to, etc.?
Typically this is automatically provided from the Fleet Config by using jaia admin fleet generate which writes the required first-boot.preseed.yml and SSH keys mentioned, below.
This information is provided via a first-boot.preseed.yml YAML configuration file, conforming to the standards of the cloud-init project's user-data file format.
Additionally, two optional SSH key pairs can be provided (in /boot/firmware/jaiabot/init):
hub<N>_fleet<F> (private) / hub<N>_fleet<F>.pub (public), where <N> is the hub ID and <F> is the fleet ID. If this is present, it will be installed to /home/jaiabot/.ssh and an SSH config file generated to allow host keys to be automatically added upon first connection to the bots. This key can be generated using: id_vpn_tmp (private) / id_vpn_tmp.pub (public) can be provided. This key must first be added to vpn.jaia.tech as a temporary access key (e.g. for 1 day of validity) using jaia admin ssh add. It will then be used by the first-boot setup to configure both the server and client sides of the service (fleet) VPN. This key can be generated and provisioned using: The template of the text file first-boot.preseed.yml is provided on the image as /boot/firmware/jaiabot/init/first-boot.preseed.yml.j2 (This is a jinja2 template file used by jaia fleet admin generate).
Configuration will happen automatically without user intervention or the requirement for connecting a monitor or DHCP based SSH session.
To debug the preseed configuration functionality, connect a monitor and/or examine the cloud-init logs in /var/log.
Please note: for security reasons the first-boot script will lock the jaia user password (disallowing password-based logins). Future logins must be done via SSH using key pairs, and sudo is provided without need for a password. You can add any SSH public keys required to login to the appropriate section of the preseed file prior to booting the image.
First boot configuration is now handled by cloud-init using the NoCloud data source for the Raspberry Pi image. cloud-init is configured (via the kernel command line parameter ds=nocloud;s=/etc/jaiabot/init in /boot/firmware/cmdline.txt) to use the files in /etc/jaiabot/init (except for first-boot.preseed.yml). The important file is user-data which in our case simply includes two local "user data" YAML files in the same directory:
common-first-boot.yml: Common actions that must be undertaken on first boot for all systems. This should only be edited if all the bots/hubs need to be configured in a different way. Only actions that cannot be performed at rootfs generation time (in CircleCI) should be included in this file (e.g., resizing the log partition to fill a disk of unknown size, installing jaiabot-embedded as this flashes the Arduino, etc.). Otherwise it is preferred to use jaiabot/rootfs/customization (either includes.chroot for files to include or hooks for scripts to run).first-boot.preseed.yml: The previously discussed preseed file specific to the bot or hub being configured.These files are separated to reduce clutter in the first-boot.preseed.yml file. The source for both of these files is in jaiabot/rootfs/customization/includes.chroot/etc/jaiabot/init.
We use systemd to launch the jaiabot services on the embedded system, just as any other Ubuntu daemon.
Each application has a service definition, and they are all set to BindTo the jaia.service which exists to provide a common service that can be stopped or started, thereby stopping or starting all the bound services.
When using the jaiabot-embedded Debian package, the systemd services are automatically installed to /etc/systemd/system and enabled. No further action is required in this case.
When using a built-from-source version of jaiabot, ensure that the local bin directory is on your $PATH (e.g., check that which jaiabot_mission_manager returns the correct binary), then run:
Bot 0 (install and enable):
Hub (install and enable):
See ./systemd-local.sh --help for more options.
The systemd services are all controlled by a single jaiabot.service which doesn't do anything itself, but serves as a single point from which all the other services can be stopped, started, etc.
Then, jaiabot_gobyd and jaiabot_moosdb are bound to jaiabot and start their respective middleware's broker (gobyd and MOOSDB). From there, all the client services are bound to the respective broker's service. This ensures that no Goby apps are started before gobyd and no MOOS apps are started before MOOSDB. The Python apps are also bound to jaiabot_gobyd at the moment since they are used exclusively by the Goby driver applications. If this changes, these services can be updated.
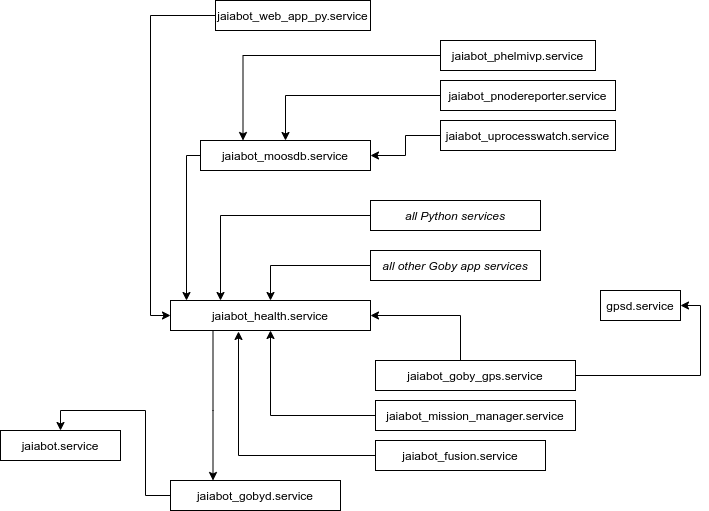
The jaiabot.service waits for the system clock to be synchronized via NTP (via the GPS using gpsd) or until 120 seconds has elapsed.
The systemd service files are generated via templates much like the application configuration.
The generation script lives in: jaiabot/config/gen/systemd.py and can be run to install systemd service jobs for either a locally built copy of jaiabot or used during the Debian package build.
To see all the options for configuring this script, run systemd.py --help
For a locally built copy, you can use the systemd-local.sh shell script (a thin wrapper around systemd.py that executes systemd.py using the current interactive shell settings, such as $PATH).
This script will generally have the correct defaults for the various directories, assuming that the version of the jaiabot apps and the Goby applications (gobyd, etc.) that you wish to run are currently set correctly in the shell $PATH environmental variable at the time of running the gen/systemd-local.sh generation script.
Running ./systemd-local.sh --help will always show the defaults inferred from the $PATH for all the directories (--jaiabot_bin_dir, --jaiabot_share_dir, etc.)
Vagrant is a useful tool for creating and managing full virtual machines (VMs), which allows us to quickly spin up and delete standard amd64 VMs for deployment testing (such as systemd or package testing before deployment to the actual Raspberry Pi hardware).
This generates a Vagrantfile in the current working directory, which can be modified to fit our needs. For example, to create a VM for Virtualbox with 8 CPUs and 1GB memory, we can uncomment and edit this block from the Vagrantfile:
To start the machine from the directory with the Vagrantfile, simply run
To ssh in, run
To destroy the VM, use vagrant destroy.