|
JaiaBot 2.7.0
JaiaBot micro-AUV software
|

|
|
JaiaBot 2.7.0
JaiaBot micro-AUV software
|
|
The Jaia Cloud is designed to provide:
It is possible to have a VirtualFleet without a corresponding real fleet or vice-versa.
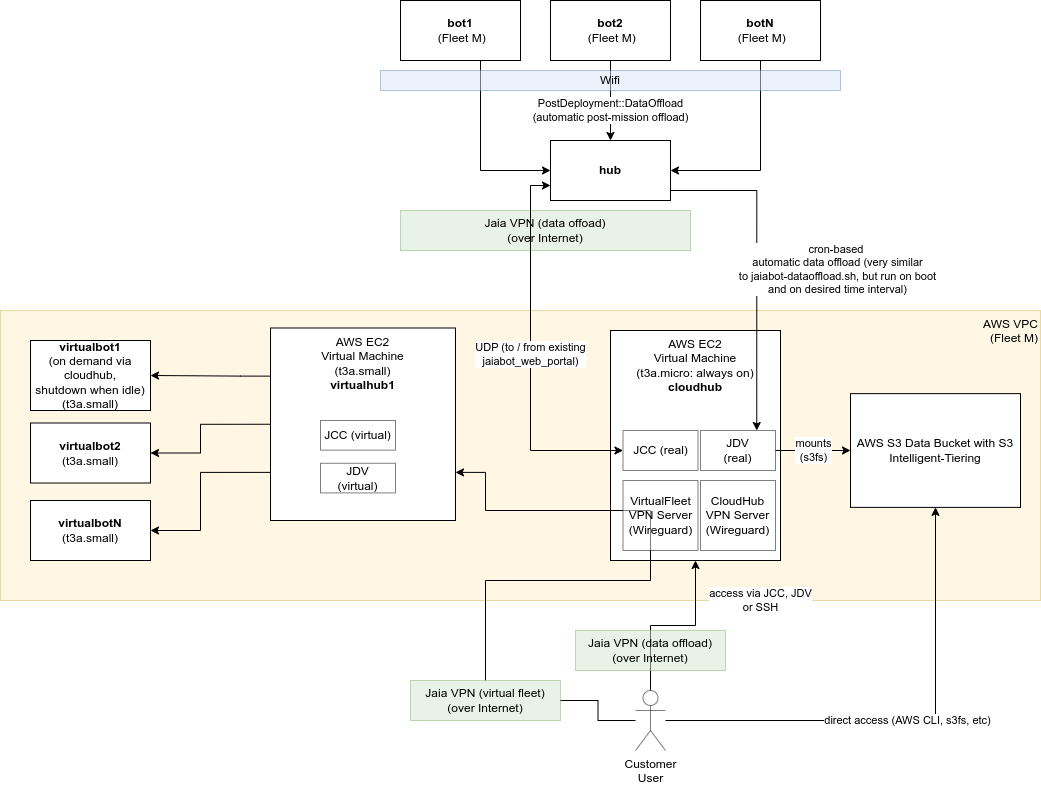
Each VPC has one and only one fleet. At a minimum this is a CloudHub machine, which is always on.
The components of the VPC include:
The use of the jaia ip tool is recommended for determining IP addresses for a given node, id, fleet, etc.
The network address assignment for the Jaia Cloud is intended to complement the existing fleet specific VPN. This means that a given fleet may have up to three VPN subnets assigned:
These all need to be different because:
Additionally, each VPC has two subnets assigned as previously mentioned:
The prefix is fd00::/8 for unique local addresses as defined in RFC4193.
The full 48-bit prefix was (pseudo)-randomly generated as per RFC4193 for each of the three VPN classes.
| VPN Class | IPv6 Prefix |
|---|---|
| Fleet VPN | fd91:5457:1e5c::/48 |
| VirtualFleet VPN | fd6e:cf0d:aefa::/48 |
| CloudHub VPN | fd0f:77ac:4fdf::/48 |
| Physical WLAN | fddd:7f2e:3258::/48 |
For each VPN class, the Subnet ID is the Fleet ID, so for example, VirtualFleet 3 would have the subnet fd6e:cf0d:aefa:3::/64. This allows up to 2^16 = 65536 fleets to be assigned.
For a given node (bot or hub) on the VPN, the 64-bit interface identifier is given as ::0:hub_id for hubs, ::1:bot_id for bots, and ::2:customer_id for various customer machines (desktop / laptop / tablet). This allows up to 2^16 = 65536 bots and hubs to be assigned per fleet.
Some examples include:
| Bot (b) or Hub (h)? | ID | Fleet | Fleet VPN Address (s) | VirtualFleet VPN (v) Address (fN) | CloudHub VPN Address (c) |
|---|---|---|---|---|---|
| Bot | 5 | 4 | fd91:5457:1e5c:4::1:5 | fd6e:cf0d:aefa:4::1:5 | fd0f:77ac:4fdf:4::1:5 |
| Bot | 6 | 250 | fd91:5457:1e5c:fa::1:6 | fd6e:cf0d:aefa:fa::1:6 | fd0f:77ac:4fdf:fa::1:6 |
| Hub | 20 | 10 | fd91:5457:1e5c:a::14 | fd6e:cf0d:aefa:a::14 | fd0f:77ac:4fdf:a::14 |
| Hub (CloudHub (ch)) | 30 | 15 | fd91:5457:1e5c:f::1e | ffd6e:cf0d:aefa:f::1e | fd0f:77ac:4fdf:f::1e |
You can generate the values for the table above yourself using:
Once connected to the appropriate VPN and hosts are configured in /etc/hosts, one can open a web-browser as usual to JCC, etc.
For fleet1, these would be:
In addition to the CloudHub and VirtualFleet mentioned above, Jaia runs a number of "speciality" AWS servers, each with a specific primary task:
iridium.jaia.tech: Multiplexing support for Iridium satellite messaging.packages.jaia.tech: Hosts Ubuntu (*.deb) packagesdocs.jaia.tech: Documentationvpn.jaia.tech: Service VPN for remote support.*.cloud.jaia.tech: Web access with 2-factor authentication for accessing CloudHubs.We want to be able to recreate these servers from scratch for consistency of implementation, security, and AWS instance type. We want to be able to upgrade to the latest Ubuntu/Jaiabot release by rebuilding servers, and have the tools in place to recreate them in the event of an instance disk corruption or AWS failure.
This is done using a pair of scripts in jaiabot/rootfs/cloud/aws:
create_specialty_server.sh: Creates the new AWS server from a configuration file.delete_specialty_server.sh: Deletes the existing AWS server(s) for a particular server type (matching the SERVER_TYPE given in the configuration file of original invocation of create_specialty_server.sh). Primarily useful for developing a new server type configuration set when you need to create/delete the server multiple times. See "Upgrade an existing specialty server type" below for upgrading a live server.Graphically, this is the relationship between the various components:
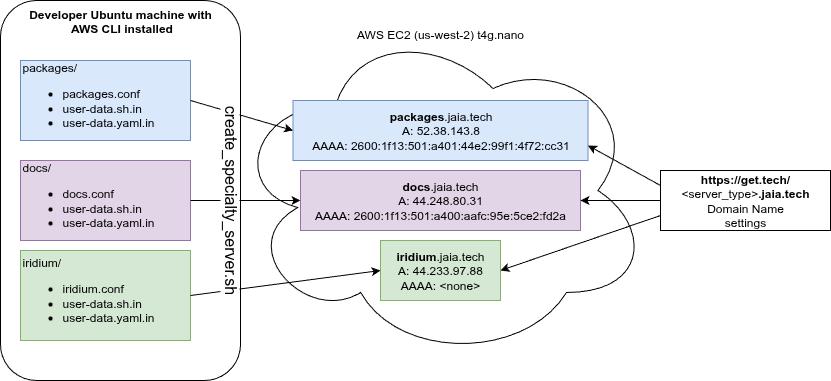
To create a new specialty server type (which we'll call "foo") you need to create three files, and by convention these are put in a subdirectory with the same name:
jaiabot/rootfs/cloud/aws/foofoo.confuser-data.sh.in or user-data.shuser-data.yaml.inThe docs and iridiumserver configurations are fairly simple, and one of these may be a useful starting point to copy for a new server configuration.
foo.conf is simply a bash shell script that is sourced by create_specialty_server.sh and must define the following variables:
SERVER_TYPE=foo: instance name, used to tag the instance and instance resources. Should match name of file and directory (foo).ENABLE_TERMINATION_PROTECTION=true or false: EC2 termination protection prevents against accidental deletion (termination) of a server unless termination protection is first removed in the console or using the AWS CLI. Useful to set false when testing creating a server (as you likely need to run delete_specialty_server.sh multiple times), but is important to set true once the server is in production to avoid accidental deletion.DEBUG=true or false: If true, outputs more information about what the script is doing.foo.conf also must define the function function create_security_group_rules() which will be run (with the SECURITY_GROUP_ID as the only parameter) to allow the script to set the appropriate AWS firewall (security group) rules. Instances should restrict the allowed firewall inputs to the minimum necessary to allow functionality.
foo.conf can also optionally include:
ELASTIC_IP_ALLOCATION_ID=eipalloc-0b2441c45eff7c158: This is an "elastic IP" address allocation ID for an existing IPv4 address that will be reassigned to this instance. It is typically convenient to reuse the Elastic IP between upgrades to the same server type so that the IP address remains the same as the old machine and thus the DNS record (A record) don't need to be changed. If unset, no Elastic IP will be set, and this should be done manually later in AWS Console. If it's a new server, you'll want to allocate an Elastic IP address manually in the console and assign a domain name A record (e.g., foo.jaia.tech) so that it can be reached conveniently. The domain name settings are done through https://get.tech/, not AWS.IPV6_ADDRESS=2001:db8:ffff:ffff:ffff:ffff:ffff:ffff: Assign this IPv6 address to the instance. If unset a new address will be assigned to the instance. Similarly to the ELASTIC_IP_ALLOCATION_ID, this should be set to upgrade an instance without having to change the domain name (AAAA) record. When creating a new server, you can leave this blank to let AWS allocate an IPv6 address, then just keep track of it for future upgrades.ARCH=arm64: Architecture for the instance (must match INSTANCE_TYPE architecture). Default is arm64 to match t4g.nanoINSTANCE_TYPE=t4g.nano: Instance type: default is t4g.nano (very small arm64 instance).REGION=us-west-2: Region, default is us-west-2DISK_SIZE_GB=8: Size of disk in GB (default 8).user-data.*.in (see below).These are template files for cloud-init user-data configuration. Both must be included but one may be left empty, except for the header line.
Minimal user-data.sh.in or user-data.sh:
Minimal user-data.yaml.in:
Both *.in configuration files are preprocessed using bash before being passed to cloud-init so that bash variables (${}) are expanded using the values in foo.conf and jaiabot/scripts/common-versions.env. If user-data.sh is specified instead, it will be used directly without preprocessing.
The contents of the preprocessed files are used by cloud-init to seed the new server instance. See the cloud-init documentation for more details.
Some servers will require manually copying data from the old server, or restoring a backup. For example, when upgrading the packages.jaia.tech server we copy the existing .deb files, etc. from the old server so that all of these .deb packages don't have to be rebuilt.
The user-data.*.in configuration files should install a script that can be run after the server is up and running. See the /home/jaia/sync_from_prior_packages_server.sh script installed by the jaiabot/rootfs/cloud/aws/packages/user-data.sh.in configuration file for an example.
The documentation for that server should describe the use of such a manual synchronization script.
Run create_specialty_server.sh foo/foo.conf to create the new server.
When testing the creation of a new server type, you may be creating and deleting the server multiple times before you are satisfied with the new configuration. Here it is helpful to set:
ENABLE_TERMINATION_PROTECTION=false
so that you can easily delete the new server until it works correctly. Once you have a working server you can go in to the AWS console and enable termination protection for that instance (or delete and rebuild one last time with ENABLE_TERMINATION_PROTECTION=true).
To upgrade an existing server, the following set of steps is recommended:
{server_type}.conf file so that the new instance does not replace the existing (live) old server's IP addresses.create_specialty_server.sh.Actions->Networking->Manage IP addresses for the new server. This makes the new server live, so be careful about the timing, depending on the server's usage.Actions->Instance Settings->Change termination protection. Terminate (delete) the old instance.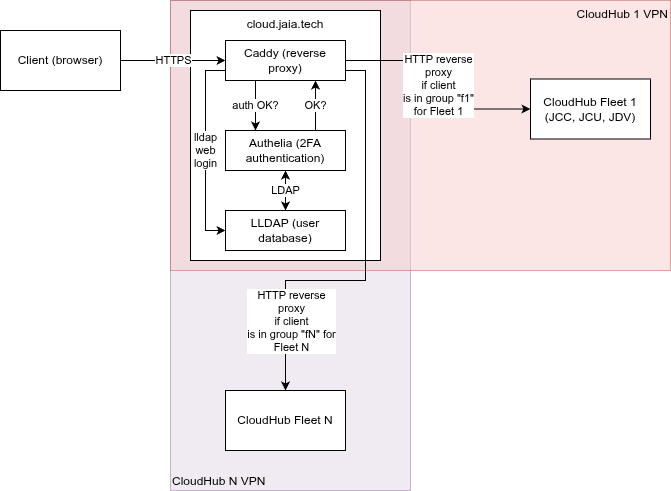
The Cloud Login Server (*.cloud.jaia.tech) manages user authentication (with 2-factor [2FA] verification) for access to CloudHub resources. This provides a more convenient way to access the JCC and other CloudHub applications without requiring that the client machine have the Wireguard VPN installed.
This server is implemented using three open source projects:
In short, Authelia manages authentication, Caddy manages the reverse proxy (between the insecure HTTP applications and the authenticated HTTPS connection), and LLDAP manages the user information (user names, group, passwords, etc.).
These all run on a single machine, cloud.jaia.tech.
CloudHub access:
Supporting web pages: