|
JaiaBot
1.20.0
JaiaBot micro-AUV software
|


|
|
JaiaBot
1.20.0
JaiaBot micro-AUV software
|
|
JaiaBot development is done on Ubuntu Linux, with the version of Ubuntu supported aligned with the jaiabot release branch (see Repository page).
The JaiaBot software depends on Goby3, MOOS, and other packages.
When using the jaiabot Debian packages (see the CI/CD section below), these dependencies are automatically installed by apt.
When building from source, these can be installed from the regular Ubuntu package repositories plus the packages.jaia.tech mirror of the packages.gobysoft.org repository (also reference the steps in jaiabot/.docker/focal/amd64/Dockerfile):
The jaiabot software is configured using CMake which (by default) then generates Makefiles that the make tool uses to invoke the C++ compiler and linker.
This process is summarized by:
This project provides a convenience script called build.sh that runs cmake to configure and build the project (using as many jobs as your machine has processors). The build.sh script segregates the CMake working directory by machine architecture (e.g. build/amd64, build/arm64, etc.). Additionally, you can set the environmental variables JAIABOT_CMAKE_FLAGS and/or JAIABOT_MAKE_FLAGS to pass command line parameters to CMake (during configure) or make, respectively.
Running the build script will start a parallel build using a number of processors that is equal to the lesser of:
You can manually define the number of CPUs to use by setting the JAIA_BUILD_NPROC environment variable.
Some examples:
Basic build:
Build documentation as well:
Continuous integration (CI) and continuous deployment (CD) are software best practices to ensure that code is quickly and easily integrated and tested. The CI part is managed by a standard Git workflow of committing regularly, pushing changes to Github.com, and integrating back to the 1.y "main" branch using the pull request feature on Github.
The CD part is managed by CircleCI, which is a cloud-based configurable build and test system. The .circleci/config.yml file configures the actions ("workflow") performed by the CircleCI servers. Open source projects get substantial free credits for building with CircleCI.
We use CircleCI to do two main types of builds:
apt. These are categorized to allow for a stratification of stability versus the latest features:1.y1.y branch (usually the result of a pull request merge). This is the newest code._ (e.g., 1.0.0_beta1) which is changed to ~ (e.g. 1.0.0~beta1). Git does not allow ~ in tag names, hence the substitution.git tag), e.g., 1.0.0.The interaction between the developers and the automated CI/CD system is summarized in the following figure:
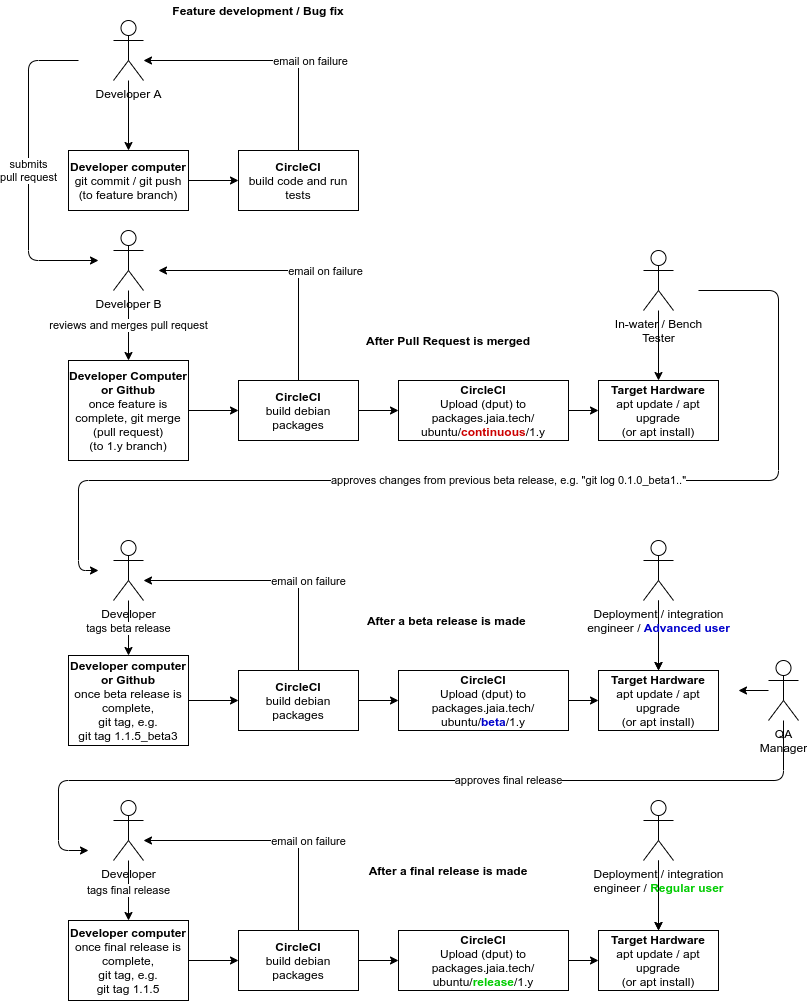
When the developer is working on a new feature or fixing a bug, he or she branches the code into a "feature branch", then incrementally commits and pushes these changes. Each commit that is pushed triggers a basic build on CircleCI to ensure that the committed code compiles correctly and the existing unit tests pass.
Once the developer has completed his or her feature or bug fix, he or she puts a "pull request" up on Github to be reviewed by another member of the software team. The pull request is generally set to merge the feature branch (e.g. "my-new-feature-xyz") into the "main" branch (1.y in our case). After review (using the GitHub UI), the reviewer merges the pull request and this automatically triggers the CircleCI system to do a package build of the code. These packages (.deb packages for installing on Ubuntu) are pushed the continuous repository on packages.jaia.tech. At this point, they can be installed using apt onto any system with that repository installed:
Once the decision has been made to release the software, a tag is made on the git repository and pushed to Github. The creation of a new tag automatically triggers a CircleCI build that is the same as the continuous build but is pushed to a different repository.
Depending on the tag structure, this may either be the beta/1.y or release/1.y. Beta releases are tagged as x.y.z_betaN (e.g., 1.0.5_beta3) which becomes Debian version x.y.z~betaN during the CircleCI build.
To use the release or beta repository, simply run the same commands as in the previous section, just substitute http://packages.jaia.tech/ubuntu/release/1.y/ or http://packages.jaia.tech/ubuntu/beta/1.y/for http://packages.jaia.tech/ubuntu/continuous/1.y/.
It is perfectly fine to have more than one of these repositories installed at once. In all cases the newest code will be installed (so if you have both release and continuous installed, you will always get packages from continuous, or if you have release and beta installed, you will get packages from beta).
Debian packages are given versions based on the git tag version (for "release" or "beta" packages) or the last tagged release plus the git hash (for "continuous" packages).
The ~ used by Debian that sorts before any other versions is not allowed as a symbol in git tags, so we substitute _ instead. For example git tag 1.0.0_beta1 becomes Debian version 1.0.0~beta1 which is treated as an earlier version than 1.0.0.
Additionally the Ubuntu version that the package is build for is appended to the version name as ~ubuntuXX.YY.Z
Examples:
git tag 1.0.0 built on Ubuntu 20.04 "focal" becomes Debian version 1.0.0-0~ubuntu20.04.1git tag 1.0.0_alpha1 built on Ubuntu 18.04 "xenial" becomes Debian version 1.0.0~alpha1+5+g8f9b675-0~ubuntu18.04.1This scheme ensures that continuous packages are considered to always be newer versions (by the rules of apt) than the last (beta or regular) release. This also ensures that each version can be tracked back to the git tag or git hash from which it was built.
This section describes the process by which the packages.jaia.tech VM was initially configured, in the event that it needs to be re-created, or modified.
packages.jaia.tech is hosted on AWS as an EC2 virtual machine with Ubuntu 22.04 EC2 using the t3a.micro instance type and a 30 GB SSD.
The default user (ubuntu) is configured with the appropriate SSH keys for general access.
A secondary unprivileged (no sudo) user was created for the dput uploads. This user is only configured for login with the id_packages_ssh public SSH key (private key is set in CircleCI):
mini-dinstall manages the actual Debian repository on packages.jaia.tech. dput uploads packages (from CircleCI). For integrity reasons, packages are signed after building using a known GPG key (which is verified when you do an apt install ...). This is done by the sign_release.sh script.
I copied these files (mini-dinstall.conf and sign_release.sh from jaiabot/scripts/packages to /opt/jaia_packages on packages.jaia.tech).
As the repositories are hosted using HTTP via Apache2, I created the empty repository directories and made dput the user:
In order to upload packages, CircleCI needs to be able to SSH to packages.jaia.tech. For this reason, I created a dedicated SSH key pair (written to id_packages_ssh / id_packages_ssh.pub):
I added the id_packages_ssh.pub to /home/dput/.ssh/authorized_keys and the private key (id_packages_ssh) to the appropriate CircleCI setting.
The configuration for dput is in jaiabot/.circleci/dput.cf. It is configured for each of the existing three repositories: jaiabot-continuous-1.y for /var/www/html/ubuntu/continuous/1.y, jaiabot-beta-1.y for /var/www/html/ubuntu/beta/1.y and jaiabot-release-1.y for /var/www/html/ubuntu/release/1.y.
I created a GPG key for signing (as dput user):
and the fingerprint of the resulting (public) key was 954A004CD5D8CF32.
In order for CircleCI builds to sign the package, the GPG private key must be available to CircleCI but kept private (so it can't be in jaiabot):
The resulting contents was copied into Circle CI private environmental variable configuration and called "GPG_KEY" (which is later used by jaiabot/.circleci/config.yml).
To control the version of the GobySoft packages used, we maintain a mirror of packages.gobysoft.org (for each release series: 1.y, 2.y, etc. and two release levels: "release" and "staging") that can be manually updated as necessary using the update_gobysoft_mirror.sh script.
Two GobySoft mirrors are provided ("release" and "staging") so that new updates to GobySoft packages can be progressively tested and merged into the JaiaBot repository.
The script update_gobysoft_mirror.sh in jaiabot/scripts/packages (copied to /opt/jaia_packages on packages.jaia.tech) can be used to interactively manage the state of the GobySoft mirrors and their relation to the Jaiabot release distributions.
The script has three actions:
apt-mirror to pull the latest packages.gobysoft.org packages into the staging mirror (/var/spool/apt-mirror/staging/${branch} where ${branch} is one of 1.y, 2.y, etc.). This will also prompt for "Choose Staging and Release Repositories" after completion of apt-mirror./var/spool/apt-mirror/release/${branch}) and set all repositories to point to this release mirror./var/spool/apt-mirror/[staging|release]/${branch}/mirror/packages.gobysoft.org/ubuntu/release to /var/www/html/ubuntu/gobysoft/[test|continuous|beta|release]/${branch}.(For backwards compatibility, /var/www/html/ubuntu/gobysoft/1.y is manually symlinked to /var/www/html/ubuntu/gobysoft/release/1.y)
The general process for pulling in a new Goby release should be:
update_gobysoft_mirror.sh and choose "Update Staging Mirror". Then select "test" and "continuous" for the repos to link to staging (do not select "beta" yet; "beta" (and "release") will continue to use the old GobySoft "release" repo).jaiabot.list repos:update_gobysoft_mirror.sh and choose "Choose Staging and Release Repositories", selecting "test", "continuous", and "beta" as the repos to link to staging.jaiabot with the beta tag and push. This will trigger a CircleCI "beta" build against the staging repo.jaiabot.list repos: update_gobysoft_mirror.sh and choose "Update Release Mirror from Staging". This will copy the staging mirror in to the release mirror and point all the repos to the release mirror.jaiabot with the release tag and push. This will trigger a CircleCI "release" build against the (newly updated) release repo.The default update path assumes a reasonably fast internet connection to the public Ubuntu repositories and packages.jaia.tech. This is not always the case, so two alternative update pathways are provided:
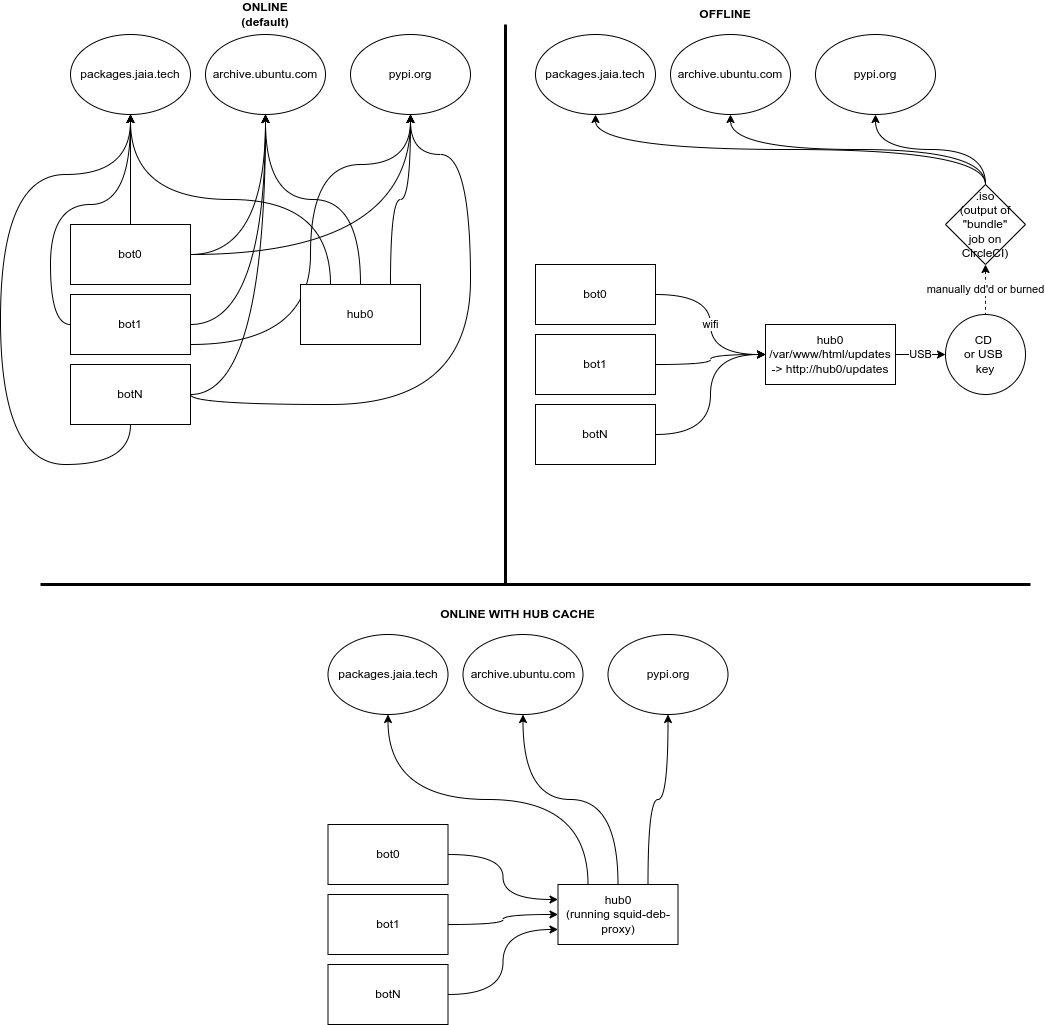
The Ansible playbook jaiabot/config/ansible/change-sources.yml can be used to change the update mode for a given fleet (this can also be run with the Liaison pre-launch UI with role == ADVANCED or higher).
Update many bots at once can place high demands on the internet connection as they all have to fetch the same .deb packages. To reduce this load, we can configure the hub to act as a caching proxy using the squid-deb-proxy package. In this case, the hub will cache any packages requested so that future requests are served locally by the hub rather than requiring another internet download.
To enable online mode with hub caching:
For some scenarios, the fleet must be updated without connecting it to the internet. For this reason, each CircleCI build of Debian packages also creates an .iso (CD image) that contains the jaiabot-embedded Debian package and all its dependencies (recursively, based of the base ubuntu Docker image). Additionally it includes the required Python wheels used by pip when installing jaiabot-python.
This .iso is then burned to a CD or dd'd to a USB key and connected to hub0 of the fleet. The /etc/fstab will already include the mount point (based off the ISO label: updates), so simply running sudo mount -a or rebooting the hub will mount this disk to /var/www/html/updates (which is served by Apache2 as http://hub0/updates).
To enable offline mode:
At this point each bot and hub in the fleet can be updated by simply running sudo apt update && sudo apt dist-upgrade, exactly as if it was connected to the internet.
Please keep in mind that the offline updates do not include the usual Ubuntu security patches so are not suitable for internet-connected machines (use the Online or Online update with Hub Caching in this case to ensure security updates are installed).
To revert to "normal" online updates after using one of the alternatives (or to switch the repo or version), you can use the same playbook:
This process is being deprecated in favor of using the continuous Debian packages described above. However, it still may be useful in some scenarios.
For rapid turnaround development where it is infeasible to wait for the CI/CD packages to complete, we can cross-compile for the jaiabot code for the ARM64 target (Raspberry Pi) using a Docker container that holds all the appropriate dependencies:
To create the docker image initially (should only need to be done initially and whenever there are updates to the dependencies):
Then to cross-compile using this image:
If you rsync the contents of jaiabot/build/bin and jaiabot/build/lib to the Raspberry Pi at /home/ubuntu/jaiabot you should be able to run them successfully.
(This assumes that /home/ubuntu/jaiabot/build exists on the Raspberry Pi, if not, mkdir it first):
Use the all-in-one-script (/scripts/docker_arm64_build-and-deploy.sh):